With the release of 3ds Max 2009, the Steering Wheel and ViewCube were introduced. They were designed with the intention of helping users navigate their scenes easier. For some users, it just clutters up the workspace.
ViewCube
The ViewCube originates from Autodesk Inventor, which has had this feature for many years, and was later ported to Maya and 3ds Max. The ViewCube allows users to quickly click on a face of the cube, and the scene will adjust so that the face clicked will face the user. Clicking on the house icon will change your view to the default Perspective view.
You can access the settings for the ViewCube by going to Views -> ViewCube -> Configure...
The config screen lets you enable/disable the ViewCube, adjust the size, transparency, and other settings.
How to enable/disable the ViewCube:
Hold down Alt + Ctrl + V
You can also click on the [+] in any viewport and go to ViewCube -> Show the ViewCube
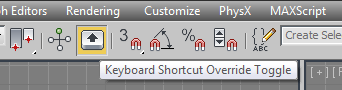
For the keyboard shortcut to work, Keyboard Shortcut Override Toggle must be enabled.
Steering Wheel
There are three steering wheels, and they offer a variety of camera controls to help navigate your scene. If the steering wheel is enabled, it will follow the mouse around the screen. The default steering wheel, seen above, offers the most tools.
Tour Building Wheel
View Object Wheel
Similar to the ViewCube, you can access the settings for the Steering Wheels by going to Views -> SteeringWheels -> Configure...
Or you can click the small downwards arrow on the steering wheel in the lower right corner.
How to enable/disable the SteeringWheel:
Hold down Shift + W to enable the wheel.
Press Esc to disable the wheel.
You can also click on the [+] in any viewport and go to SteeringWheels -> Toggle SteeringWheels
For the keyboard shortcut to work, Keyboard Shortcut Override Toggle must be enabled.
3ds Max 2011 introduced a new Material Editor, the Slate Material Editor, which was based on Maya's Hypershade. Since Autodesk owns both 3ds Max and Maya, they are trying to bridge the gap between the two programs. Personally, I don't like Maya's Hypershade, but the Slate Editor is much better than the Hypershade. Regardless, I like the old Material Editor.
Slate Editor
How to switch to the original material editor:
With the Slate Editor open, go to Modes -> Compact Material Editor...
This will close the Slate Editor and launch the original Material Editor.
The new Slate Editor isn't all bad, so I will give a quick run down on how to use it.
On the left side, you have your starting defaults that you would find if you were to click the Get Material button, or the button that says Standard. To start, just double click the material you want to start with. I chose Standard for the image above.
Now you should see the blue box in the material editor. To get the paramaters to show up on the right, double click the name of the material in the blue box in the middle of the editor. So, for this example, you would double click on the words Material #27.
Gizmos, everbody loves gizmos right? Except for Blender users, they don't really care for gizmos...
What's a gizmo? You don't know? A gizmo is the icon that you use to move/rotate/scale objects, they show up whenever you select an object while you have a transform tool activated. Did you know you could turn them on and off? What about making them bigger and smaller?
Gizmo enabled
How to enable/disable the gizmo:
Press "X" and you can toggle the gizmo on and off.
Gizmo disabled
How to increase/decrease the size of the gizmo:
Press the "+" and "-" keys to increase and descrease the size of the gizmo. Note that you can not use the +/- keys on the numberpad.
You can also control the size of the gizmos through the preferences by going to Customize -> Preferences... -> Gizmo tab. The Relative Size field controls the size.
Starting with 3ds Max 2010 I believe, they introduced the Graphite Modeling Tools ribbon. It is a large ribbon with lots of buttons on it, replacing the Main Toolbar. Depending on what object you have selected, and what modifiers on the object, the ribbon's icons change. I believe the idea was to offer commonly used tools in a quick to get to place. However, it is rather CPU intensive, and wastes valuable screen real estate.
How to disable:
Go to Customize -> Show UI -> Show Ribbon.
You may have noticed that all of your objects have a white box around them in the Perspective View when selected or you are creating a new object. This is the object's bounding box, showing you the extents of the model.
How to disable:
Simply press "J" on the keyboard, which is assigned to Show Selection Bracket Toggle.
This white box is also used as an indicator for the object's keyframes. If the object is animated, the whitebox will show up if you move the Time Slider to a frame with a keyframe on it. Disabling the Selection Bracket will also remove this feature, but only in the Perspective View. If you want to disable this feature in all of the viewports, you will need to press "J" in each viewport.
There are several ways to make your objects editable, and one of the most common is Edit Poly/Editable Poly. But which one do you use? Edit Poly
Edit Poly is a modifier that you apply to your object via the Modifier Tab. If you look at the image below, you will see all of the options available to the Edit Poly modifier. The first thing you should note is that you can access the original settings for the object you applied the Edit Poly modifier to, in this case, the Box. Keep in mind that if you have already altered your model by moving vertices or faces, etc., and then go back to the Box settings, it may change your model in unexpected ways.
Edit Poly Modifier
The one thing that Edit Poly has that Editable Poly does not have is the Edit Poly Mode rollout. According to the documentation,
"This rollout provides access to Edit Poly's two modes of operation: Model, for modeling, and Animate,
for animation of modeling effects. For example, you can animate the Taper and
Twist settings for polygons extruded along a spline.
During and between
sessions, 3ds Max remembers the current mode for each object separately. The
same mode remains active at all sub-object levels.
Edit Poly Mode also
gives you access to the current operation's caddy,
if any, and lets you commit to or cancel out of modeling and animation changes."
Editable Poly
There are two ways to make your object an Editable Poly. The first is to right click on your object, go to Convert To: in the quad menu, and then choose Convert to Editable Poly. The other method is to right click on the object's stack on the Modifer Tab, and choose Collapse To. Keep in mind that you will lose the ability to access any of the previous modifiers once it is converted to an Editable Poly.
If you look at the image below, you will see all of the options available to the Editable Poly.
Editable Poly
What you should notice right away is that there is now a Subdivision Surface and Subdivision Displacement rollout, with everything else being identical to the Edit Poly modifier. The Subdivision Surface rollout lets your smooth your object without having to apply a TurboSmooth or MeshSmooth modifier. In order to activate the smoothing, just put a check mark in the Use NURMS Subdivision box. According to the documentation, the Subdivision Displacement rollout,
Specifies surface approximation
settings for subdividing an editable poly object. These controls work like the
surface approximation settings for NURBS
surfaces. They are used when you apply a displacement
map to the editable poly object.
Closing Comments
I usually use the Edit Poly modifier because it does not collapse the stack, and you can stack multiple Edit Poly modifiers and make changes. If you don't like the changes you made, you can delete that modifier and still have your previous work. However, sometimes you need to collapse the stack, which is where the Editable Poly comes in handy.
Of course, there's also Edit Mesh, Edit Patch, Editable Mesh, and Editable Patch. These are similar to the two I discussed in this post, and I may dedicate posts to them as well.
When I first tried the trial of 3ds Max, I had no idea what I was doing, and just assumed that everyone created their models from the basic shapes listed on the right (the Command Panel). However, that is not the case. You can watch the video above, or read the article below, they both cover the same material, but this article is more in depth.
Command Panel
The Command Panel consists of 6 tabs.
Create
Modify
Hierarchy
Motion
Display
Utilities
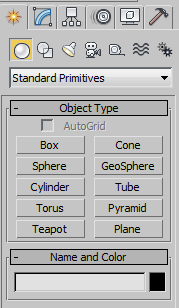
We will discuss the first two tabs in this blog entry. The first tab, the Create tab is where you will create a base for your model, something to work from. Most people will choose a Box or Plane, they are usually the easiest to manipulate. If you were to click on the drop down that says Standard Primitives, you will see more options, these will show you more objects to pick from.
If you notice, just above the words Standard Primitives, there are 7 icons, with the first being highlighted. These are more objects you can create, but they are different types. They are as follow:
Geometry
Shapes
Lights
Cameras
Helpers
Space Warps
Systems
We will just be talking about the Geometry type today.
It all begins by creating your first object. To do this, click on the Box button on the Command Panel. Then, in any viewport, click and drag. This will create the first face of your box. Release the mouse button and you will see that the box moves with your mouse. The next time you click will set the height of the box. Right Click to exit creation mode, otherwise you will keep creating boxes. You can adjust the parameters for the box by adjusting the values in the Command Panel.
In order for you to see the segements change, you need to click on [Smooth + Highlights] and select Edged Faces or you can press F4.
Now for the most important part, making your object editable. There are two ways to do this. The first is that you can Right Click on your object and go to Convert To: and choose Convert to Editable Poly.
Or, you can go to the Modify Tab and add an Edit Poly modifier by choosing Edit Poly from the Modifiers List drop down menu.
Either method is fine, I will go into more details about the differences of the two methods in another blog post. Now that your object is editable, you can create any shape you want. To do this, you need to choose a mode in the Selection section of the Command Panel.
There are five selection modes you can use to edit your object:
Vertex
Edge
Border
Face
Element
After selecting a selection mode, there are three basic ways to edit your object via the Main Toolbar:
Move
Rotate
Scale
There are also several different ways to manipulate your object through the Command Panel. Each selection mode has its own different ways, and the Command Panel changes whenever you change selection modes. The video at the top of this entry goes through some of the different methods briefly.
The last thing I will discuss is how to navigate your viewports:
Pan - Hold down the Middle Mouse Button (MMB) to pan your screen.
Rotate - Hold down the Middle Mouse Button and the Alt key to rotate around your selected object.
Zoom - Use the scroll wheel on the mouse to zoom in and out.
Zoom Extents All - Press Z to have all of the viewports zoom to your selected object.
As I said before, I won't post many tutorials, but I thought it was important to cover the basics of how to use 3ds Max. I recommend that you just do a Google search for 3ds Max tutorials.
Depending on what you want to do with 3ds Max, will determine which version you will want to download. I would recommend to everyone to download 3ds Max and not 3ds Max Design. 3ds Max Design does not support the 3ds Max SDK, but has special tools for Civil 3D integration and special lighting analysis.
If you are a student, you can download a free 3-year student license for all of the Autodesk products, you just need to have a .edu email address:
My name is Mason, and welcome to my blog. I have been using 3ds Max off and on for about six years, and started this blog with the intention of sharing some tips and tricks that I have seen over the years. There won't be many tutorials posted, but little things to help speed up your workflow or talk about some common problems.
This is my first time using a blog, so please bear with me if there are any technical difficulties.