Sunday, December 2, 2012

How to quickly cycle through "Scale" options

The scale tool has three different modes, each one working a little different. But, did you know that you could quickly cycle through all three modes with the press of a button?

Select and Uniform Scale
Select and Non-Uniform Scale
Select and Squash

How to cycle through the modes:
Press the "R" key multiple times. The first time you press it, it will switch to the Scale tool and whatever mode it was last on. The next time you press the "R" key, it will switch to the next mode. "R" is the default hotkey for the Scale tool.


Select and Uniform Scale:
The Select And Uniform Scale button, available from the Select And Scale flyout, lets you scale objects by the same amount along all three axes, maintaining the object's original proportions.

Select and Non-Uniform Scale:
The Select And Non-Uniform Scale button, available from the Select And Scale flyout, lets you scale objects in a non-uniform manner according to the active axis constraint.

Select and Squash:
The Select And Squash tool is useful for creating different phases of the “squash and stretch”-style animation often found in cartoons. The Select And Squash tool, available from the Select And Scale flyout, lets you scale objects according to the active axis constraint. Squashing an object always involves scaling down on one axis while simultaneously scaling up uniformly on the other two (or vice-versa).

Tuesday, November 27, 2012

ViewCube and Steering Wheel

With the release of 3ds Max 2009, the Steering Wheel and ViewCube were introduced. They were designed with the intention of helping users navigate their scenes easier. For some users, it just clutters up the workspace.

ViewCube

The ViewCube originates from Autodesk Inventor, which has had this feature for many years, and was later ported to Maya and 3ds Max. The ViewCube allows users to quickly click on a face of the cube, and the scene will adjust so that the face clicked will face the user. Clicking on the house icon will change your view to the default Perspective view.

You can access the settings for the ViewCube by going to Views -> ViewCube -> Configure...


The config screen lets you enable/disable the ViewCube, adjust the size, transparency, and other settings.

How to enable/disable the ViewCube:
Hold down Alt + Ctrl + V
You can also click on the [+] in any viewport and go to ViewCube -> Show the ViewCube

For the keyboard shortcut to work, Keyboard Shortcut Override Toggle must be enabled.


Steering Wheel
There are three steering wheels, and they offer a variety of camera controls to help navigate your scene. If the steering wheel is enabled, it will follow the mouse around the screen. The default steering wheel, seen above, offers the most tools.

Tour Building Wheel

View Object Wheel
Similar to the ViewCube, you can access the settings for the Steering Wheels by going to Views -> SteeringWheels -> Configure...
Or you can click the small downwards arrow on the steering wheel in the lower right corner.


How to enable/disable the SteeringWheel:
Hold down Shift + W to enable the wheel.
Press Esc to disable the wheel.
You can also click on the [+] in any viewport and go to SteeringWheels -> Toggle SteeringWheels

For the keyboard shortcut to work, Keyboard Shortcut Override Toggle must be enabled.

Monday, November 26, 2012

Material Editor / Slate Editor toggle

3ds Max 2011 introduced a new Material Editor, the Slate Material Editor, which was based on Maya's Hypershade. Since Autodesk owns both 3ds Max and Maya, they are trying to bridge the gap between the two programs. Personally, I don't like Maya's Hypershade, but the Slate Editor is much better than the Hypershade. Regardless, I like the old Material Editor.

Slate Editor


How to switch to the original material editor:
With the Slate Editor open, go to Modes -> Compact Material Editor...


This will close the Slate Editor and launch the original Material Editor.


The new Slate Editor isn't all bad, so I will give a quick run down on how to use it.


On the left side, you have your starting defaults that you would find if you were to click the Get Material button, or the button that says Standard. To start, just double click the material you want to start with. I chose Standard for the image above.

Now you should see the blue box in the material editor. To get the paramaters to show up on the right, double click the name of the material in the blue box in the middle of the editor. So, for this example, you would double click on the words Material #27.

Monday, November 19, 2012

Gizmos

Gizmos, everbody loves gizmos right? Except for Blender users, they don't really care for gizmos...

What's a gizmo? You don't know? A gizmo is the icon that you use to move/rotate/scale objects, they show up whenever you select an object while you have a transform tool activated. Did you know you could turn them on and off? What about making them bigger and smaller?

Gizmo enabled

How to enable/disable the gizmo:
Press "X" and you can toggle the gizmo on and off.

Gizmo disabled

How to increase/decrease the size of the gizmo:
Press the "+" and "-" keys to increase and descrease the size of the gizmo. Note that you can not use the +/- keys on the numberpad.

You can also control the size of the gizmos through the preferences by going to Customize -> Preferences... -> Gizmo tab. The Relative Size field controls the size.


Saturday, November 17, 2012

How to hide the ribbon

Ribbon
Starting with 3ds Max 2010 I believe, they introduced the Graphite Modeling Tools ribbon. It is a large ribbon with lots of buttons on it, replacing the Main Toolbar. Depending on what object you have selected, and what modifiers on the object, the ribbon's icons change. I believe the idea was to offer commonly used tools in a quick to get to place. However, it is rather CPU intensive, and wastes valuable screen real estate.

How to disable:
Go to Customize -> Show UI -> Show Ribbon.


How to remove the box around objects


You may have noticed that all of your objects have a white box around them in the Perspective View when selected or you are creating a new object. This is the object's bounding box, showing you the extents of the model.

How to disable:
Simply press "J" on the keyboard, which is assigned to Show Selection Bracket Toggle.


This white box is also used as an indicator for the object's keyframes. If the object is animated, the whitebox will show up if you move the Time Slider to a frame with a keyframe on it. Disabling the Selection Bracket will also remove this feature, but only in the Perspective View. If you want to disable this feature in all of the viewports, you will need to press "J" in each viewport.

Edit Poly vs Editable Poly

There are several ways to make your objects editable, and one of the most common is Edit Poly/Editable Poly. But which one do you use?

Edit Poly
Edit Poly is a modifier that you apply to your object via the Modifier Tab. If you look at the image below, you will see all of the options available to the Edit Poly modifier. The first thing you should note is that you can access the original settings for the object you applied the Edit Poly modifier to, in this case, the Box. Keep in mind that if you have already altered your model by moving vertices or faces, etc., and then go back to the Box settings, it may change your model in unexpected ways.
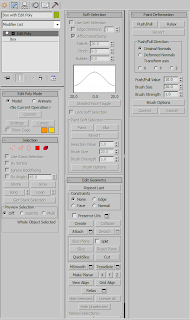
Edit Poly Modifier

The one thing that Edit Poly has that Editable Poly does not have is the Edit Poly Mode rollout. According to the documentation,
"This rollout provides access to Edit Poly's two modes of operation: Model, for modeling, and Animate, for animation of modeling effects. For example, you can animate the Taper and Twist settings for polygons extruded along a spline.
During and between sessions, 3ds Max remembers the current mode for each object separately. The same mode remains active at all sub-object levels.
Edit Poly Mode also gives you access to the current operation's caddy, if any, and lets you commit to or cancel out of modeling and animation changes."

Editable Poly
There are two ways to make your object an Editable Poly. The first is to right click on your object, go to Convert To: in the quad menu, and then choose Convert to Editable Poly. The other method is to right click on the object's stack on the Modifer Tab, and choose Collapse To. Keep in mind that you will lose the ability to access any of the previous modifiers once it is converted to an Editable Poly.
If you look at the image below, you will see all of the options available to the Editable Poly.
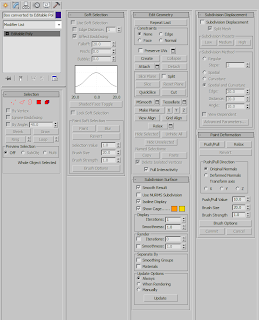
Editable Poly
What you should notice right away is that there is now a Subdivision Surface and Subdivision Displacement rollout, with everything else being identical to the Edit Poly modifier. The Subdivision Surface rollout lets your smooth your object without having to apply a TurboSmooth or MeshSmooth modifier. In order to activate the smoothing, just put a check mark in the Use NURMS Subdivision box. According to the documentation, the Subdivision Displacement rollout,
Specifies surface approximation settings for subdividing an editable poly object. These controls work like the surface approximation settings for NURBS surfaces. They are used when you apply a displacement map to the editable poly object.

Closing Comments
I usually use the Edit Poly modifier because it does not collapse the stack, and you can stack multiple Edit Poly modifiers and make changes. If you don't like the changes you made, you can delete that modifier and still have your previous work. However, sometimes you need to collapse the stack, which is where the Editable Poly comes in handy.

Of course, there's also Edit Mesh, Edit Patch, Editable Mesh, and Editable Patch. These are similar to the two I discussed in this post, and I may dedicate posts to them as well.

In the end, use what is most comfortable for you.